
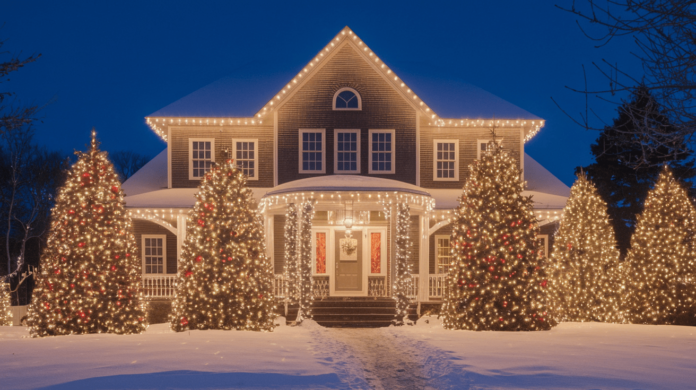
Christmas lights change how homes feel during the season. They make spaces brighter, more inviting, and full of energy. Installing them outdoors brings attention to architecture, trees, pathways, and fences. But it takes more than plugging in a few strands.
A solid plan, the right tools, and a few reliable techniques make all the difference. If you want the best christmas lights outdoor installation, it starts with understanding where to place lights, how to power them safely, and what styles work best for your space.
Start With a Simple Plan
Look at your house from the street. Think about the areas that naturally stand out. Most homeowners begin with the roofline. Others wrap columns, fences, and bushes to add layers of light.
Before you hang anything, sketch a quick layout. Note where you’ll place lights and where your power sources are. This keeps the display organized and avoids last-minute surprises.
Measure Each Section First
One common mistake is buying too few lights. Avoid guessing by measuring the areas you plan to cover.
Take a tape measure and record lengths for:
- Roof edges
- Porch railings
- Window frames
- Fence lines
- Walkways
Add a few extra feet for corners and gaps. It’s always better to have more than come up short mid-installation.
Choose the Right Lights for Each Spot
Not all lights work well in every location. The type you choose affects the look and performance.
Use this as a quick guide:
- C9 bulbs are bold and perfect for rooflines
- Mini LED lights are flexible and good for wrapping trees
- Icicle lights look great hanging from eaves
- Net lights make bushes easy to cover evenly
- Rope lights work best along walkways
Stick to one or two color schemes for a clean look. Warm white, cool white, or multicolor—pick one and be consistent throughout.
Check and Test Lights Before Installing
Before putting up anything, lay out all your lights. Plug them in and check for:
- Burned-out bulbs
- Broken wires
- Missing covers
- Color consistency
Fix issues now to avoid taking lights down later. This also helps confirm your measurements are accurate.
Focus on Safety From the Start
Outdoor Christmas lighting has to handle rain, wind, and freezing temperatures. Use only lights labeled for outdoor use. Indoor lights won’t hold up and could cause electrical problems.
Use these safety tips:
- Use GFCI outlets outdoors
- Avoid overloading one outlet or extension cord
- Never run lights through doors or windows
- Secure all plugs off the ground
Ladders should always be on flat, dry ground. Don’t lean too far while installing—move the ladder as needed.
Attach Lights Without Damaging the House
The best christmas lights outdoor installation never causes damage. Avoid nails or staples. They can split wood, ruin paint, and create leaks in your roof or siding.
Instead, use:
- Plastic shingle clips for rooflines
- Adhesive hooks for windows
- Light stakes for walkways and flower beds
- Twist ties or zip ties for railings
These options keep your lights tight, secure, and easy to remove after the season.
Roofline Lighting Tips
Roof lighting sets the tone for the entire display. Most people use large C9 or C7 bulbs along the edge.
Start at the power source. Work your way across the roof, clipping one bulb at a time. Keep spacing even.
If your home has peaks or gables, follow their shape. This creates a defined outline that frames the house well.
For multiple roof levels, light them all. Leaving one section dark can make the display feel unfinished.
Wrapping Trees and Shrubs
Trees bring depth to your outdoor display. Start at the base of the trunk and work upward.
Keep spacing tight around branches. The closer the wrap, the brighter the effect. Use mini lights or thin LED strands.
For bushes, net lights save time. They spread light evenly and cover more space in less time.
If you want variation, use warm white on the house and multicolor on the trees. Or vice versa. Just don’t mix too many types or it becomes messy.
Lighting Windows and Doors
Windows can be outlined for a sharp, symmetrical look. Use small clips or suction hooks with mini lights.
Doorways stand out more with lighted garlands or wreaths. These can be pre-lit or wrapped manually with string lights.
Make sure any plug-in decor near doors uses flat extension cords to avoid tripping hazards.
Highlighting Pathways and Walkways
Don’t forget ground-level lighting. It helps guide guests and adds balance to the upper-level roof lighting.
Use low-voltage rope lights or solar-powered stakes to line driveways and sidewalks. Keep spacing even.
Avoid placing lights where they might get buried under snow or blocked by plants.
Layering Lights for Depth
The most balanced displays use layers. Rooflines, windows, trees, bushes, and ground lighting should all work together.
Layering gives your home depth and makes it pop from the street. Start with your anchor points like the roof and work down.
From there, fill in the middle areas with shrubs and fences. Finish with trees and the ground level.
Smart Controls and Power Timers
Timers are useful for keeping lights on schedule. They save power and prevent you from having to plug and unplug everything daily.
For better control, consider smart plugs. These can be set through an app or synced with voice commands.
Avoid connecting more than three standard strands together unless the product says otherwise.
Avoid Common Mistakes
Even simple setups go wrong if rushed. Watch out for these common issues:
- Lights that hang unevenly
- Extension cords stretched across walkways
- Too many colors in one display
- Unprotected plugs exposed to rain
- Loose wires blowing in the wind
Double-check your setup in daylight and again at night. Adjust anything that looks off or creates a hazard.
Handling Bad Weather
Outdoor lights need to survive winter weather. Use clips that hold tight even in wind. Keep plugs off wet ground using brick pavers or plastic hooks.
If you expect heavy snow, avoid placing lights low to the ground where snowbanks can bury them. Check everything after storms to make sure nothing has shifted.
Maintenance During the Season
Once the display is up, it still needs occasional attention. Set a day each week to walk the yard and inspect:
- Burned out bulbs
- Loose wires or clips
- Snow or ice build-up
- Water pooling near plugs
Fixing small issues early prevents bigger problems and keeps everything looking sharp.
Storing Lights the Right Way
After the holidays, store lights properly. Wrap them around a reel or cardboard to prevent tangles.
Label strands by where they were used:
- Roof
- Trees
- Fence
- Windows
Use clear bins with lids and stack them in a dry, cool space. This saves hours of prep next year.
Reusing and Recycling Decorations
Many lights last for several years if handled well. Choose quality over quantity. Fewer well-placed lights always look better than too many poorly hung ones.
If strands stop working, check local stores for light recycling programs instead of throwing them away.
Wrapping It All Together
Creating a clean, balanced, and durable Christmas light setup doesn’t take fancy tech or massive budgets. It comes down to planning ahead, choosing the right lights, and using smart, safe installation techniques.
When you take the time to measure, test, and organize, the result speaks for itself. And with the best christmas lights outdoor installation, your home becomes part of what people love most about the season — simple, bright, and memorable.
